
In This ArticleThis article will cover the following topics:
- How to pledge collateral with Taurus Network (TN).
- How to accept a pledge as the counter-party.
- How to configure collateral transfer settings for a pledge via API.
Note: Completing this guide requires access to two PROTECT tenants that are both connected to the Taurus Network (TN).
Introduction
Once a shared address has been established with your counterparty, you can use the Taurus Network to pledge collateral to any connected participant. Collateral withdrawal permissions are fully configurable: you may require bilateral approval for any collateral call or withdrawal, delegate unilateral withdrawal rights to the counterparty, or retain exclusive control yourself. This document walks through the workflow to configure this via the API and requires steps from both the pledge initiator and the counterparty.
Pledge Workflow
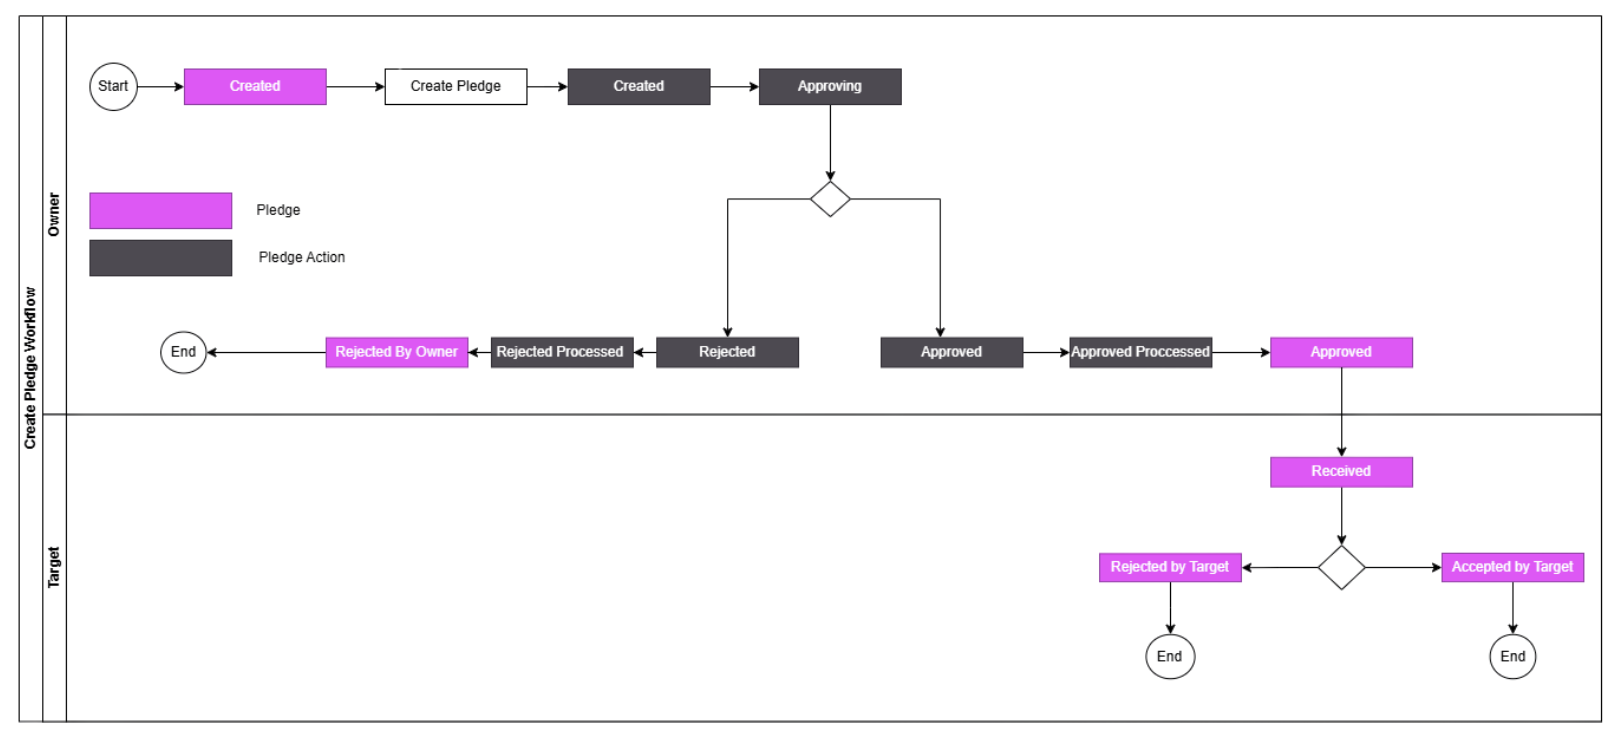
- Initiate a pledge (owner)
- Approve pledge action (owner)
- Accept a Pledge (target)
- Optionally set a default destination (if auto-approved by pledgee is enabled)
- Approve a pledge action
Initiate a Pledge (owner)
- Look up the participantID of the counter party via the List Participants endpoint.
- Look up the pledge token's CurrencyID via the List Currencies endpoint.
- Look up the shared addressID via the List Shared Addresses endpoint. If the address with the funds is not listed it must first be shared.
- Create a pledge via the Create a Pledge endpoint. , filling in the following fields:
- curencyID
- participantID
- sharedAddressID
- pledgeDurationSetup (all three values)
- pledgetype
- Confirm you receive a 200 response from the endpoint.
Approve a Pledge Action (owner)
- After creating the pledge, it must be signed using the Approve a Pledge Action endpoiint. Please see Signing for Approval for more information on signing.
- The pledge will then appear to be accepted by the counterparty.
Accept a Pledge (target)
After a participant signs a pledge request, it must be accepted by the counterparty. This is the same action on both sides. Once the counterparty signs the pledge action, it is accepted. Depending on the configured Collateral Transfer Rules, an additional step may be required, and the exact steps may vary slightly based on the selected rule.
Collateral Transfer Rule: Approved by pledgor
- Use the for-approval endpoint to find the appropriate. Save the hash of the request.
- Sign the request (note that multiple signatures may be required based on the respective Governance rules).
Collateral Transfer Rule: Approved by pledgee
- Use the for-approval endpoint to find the appropriate. Save the hash of the request.
- Call the Update Pledge endpoint and provide a default deposit address.
Important
- This must be an address that is shared with the pledgor since the address needs to be whitelisted on their side. Sharing an address with a participant whitelists the address. The address provided via the
sharedDestinationAddressIdorinternalDestinationAddressIdmust be shared. It is recommended to use thesharedDestinationAddressIdparameter.
- After updating the pledge with a shared destination address, sign the request hash to approve the transaction.
Collateral Transfer Rule: Not Allowed
No additional steps required since actual transfer of funds is disabled.
Withdraw Pledge
If the pledgor has delegated withdraw permissions, the participant can request a withdrawal with the Withdraw Pledge endpoint.
If the Collateral Transfer Rules are set to Approved by Pledgee (target), you will be able to sign the request and initiate the transfer (ensure a shared destination address is set).
ImportantThis will automatically initiate the transfer on the blockchain without approval from the pledgor.
If the Collateral Transfer Rules are set to Approved by Pledgor, (owner) you will be able to initiate a request but it will need to be signed by the pledgor.
In both cases, the transaction hash would be signed the same way any oth